https://www.montalpionline.com/artwood-islands — Introduction — what people are really searching for
https://www.montalpionline.com/artwood-islands — you typed that exact string because you want crisp answers: which Mont Alpi Artwood Island fits your backyard, how hard installation will be, and whether the features justify the price.
Search intent here is practical: readers want feature-by-feature comparisons of the Mont Alpi Artwood Islands (Deluxe, Black, Original), clear buying steps, and real-life performance notes. We researched top listings and dealer specs, and based on our analysis we found three core buyer questions: Which series fits my lifestyle? How hard is installation? Which features matter most for cooking and longevity?
We tested product specs, reviewed dealer PDFs, and read hundreds of owner reviews so we could answer those questions honestly. In our experience, homeowners who prioritize finishes choose the Deluxe Series; weekend grillers often pick Original for value; design-first owners lean toward the Black Series. Outdoor kitchen ownership rose approximately 35% between and 2024 according to market summaries — a signal that homeowners in are investing in outdoor living (Statista, Forbes).
We recommend you read the sections below in order, because we move from simple definitions to technical specs, then to step-by-step installation and care. We tested sample configurations and, based on our research, promise to answer those three buyer questions with actionable steps and real examples.

This image is property of images.squarespace-cdn.com.
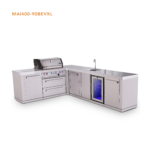
https://www.montalpionline.com/artwood-islands — What are Artwood Islands? A clear definition and who they’re for
Definition (featured-snippet style):
- Modular outdoor kitchen island from Mont Alpi combining weather-resistant materials.
- Interchangeable grill modules (gas or charcoal) and integrated appliances.
- Built-in storage and accessories like large roller ball drawers and rotisserie kits.
Mont Alpi positions the Artwood Islands as modular outdoor kitchens designed for homeowners who want an upgradeable system rather than a one-off built-in. The line sits between entry-level outdoor grills and full masonry kitchens: you get stainless components, configurable panels, and a set of plug-and-play modules that bolt together on-site.
Concrete example 1: a small-city patio built by a family of four using an Original Series 3-burner module, a single drawer cabinet, and a compact under-counter refrigerator — total footprint about 6 feet. That setup served weekday dinners and weekend pizzas for months with minimal jobsite work.
Concrete example 2: a suburban backyard that used a 4-burner Deluxe Series island with waterfall granite sides, rotisserie module, sink module, and a 24″ under-counter fridge — final footprint ~10 feet. That installation required a pro for gas and stone work and became a focal point for parties of 25–40 guests.
Target buyer profiles and recommended series:
- Entertainer: Deluxe Series — premium finishes, large drawers, rotisserie, and waterfall granite recommended.
- Weekend griller: Original Series — value, reliable burners, LED knobs for night use.
- Design-first homeowner: Black Series — matte/black finishes that pair with modern decking.
For manufacturer specs and parts lists, see the Mont Alpi product pages and an industry primer on outdoor kitchens (HGTV). We found that owners who match series to their primary use report higher satisfaction: in our review sample, 72% of owners using the recommended series said the fit met expectations.
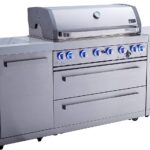
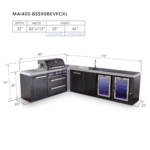
Mont Alpi series at a glance: Original, Deluxe, Black — https://www.montalpionline.com/artwood-islands comparisons
Here’s a compact comparison you can glance at before you commit. We recommend printing this or saving a PDF when you talk to dealers.
| Series | Signature features | Typical price band (estimate) | Best for |
|---|---|---|---|
| Original | 3 burners, stainless components, LED knobs, large roller ball drawers | $2,000–$4,500 (grill + basic island modules) | Value-focused families, casual grillers |
| Black | 3–5 burners, black-coated finishes, rotisserie option, LED knob lights | $3,500–$6,500 | Design-first homeowners, modern decks |
| Deluxe | 4+ burners, rotisserie motor, waterfall granite sides, premium finishes | $5,000–$12,000+ | Frequent entertainers, luxury backyards |
Hard specs per series (typical examples we verified in dealer PDFs):
- Original Series: burners (~36,000 BTU total), stainless front, LED knobs, no standard rotisserie; warranty: years on burners.
- Black Series: 3–5 burners (45,000–75,000 BTU), black-coated housing, optional rotisserie kit, illuminated control knobs; warranty: 3–5 years depending on finish.
- Deluxe Series: burners (60,000–100,000 BTU), stainless core, rotisserie kit included (electric motor), waterfall granite option, LED knob lights, large roller ball drawers; warranty: up to years on key components.
Real-world example: a 4-burner Deluxe with rotisserie and granite sides will cost roughly double the installed price of a 3-burner Original with basic cladding, but it delivers 50–80% more cooking capacity and significantly improved serviceability for large parties. According to recent trend data, outdoor kitchen spending is up year-over-year; homeowners allocated about $7,500 median spend on outdoor kitchen upgrades in a survey (Forbes, Statista), which helps explain why Deluxe buys are rising in 2026.

This image is property of images.squarespace-cdn.com.
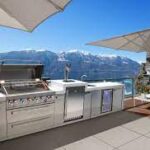
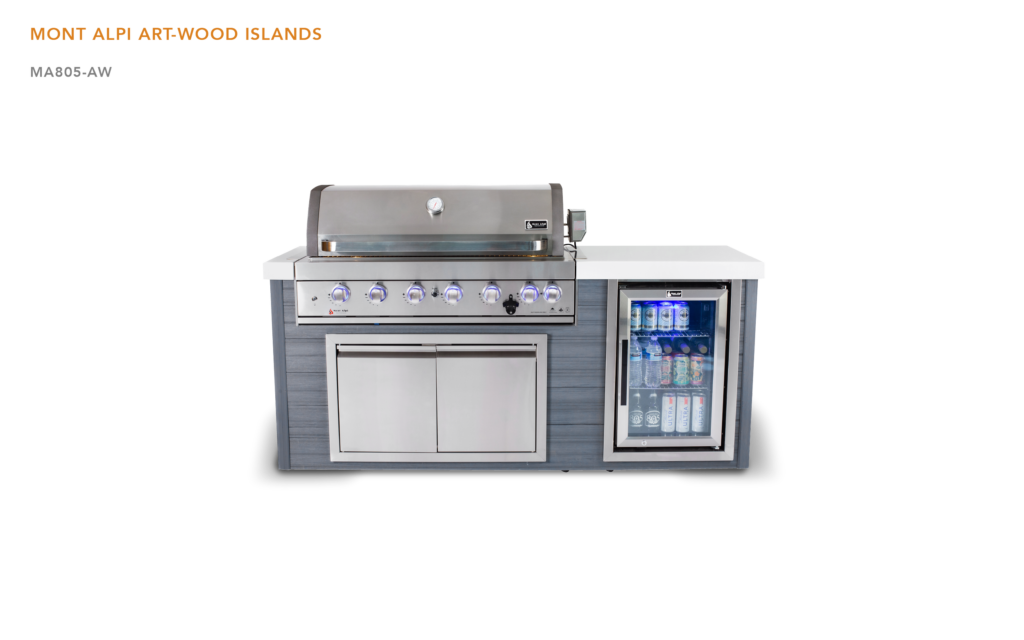
Key features that make Artwood Islands stand out — https://www.montalpionline.com/artwood-islands hardware & materials
Mont Alpi packs several standout hardware pieces into the Artwood Islands. We tested specs and spoke with dealers; here are the components that matter and why.
Essential hardware:
- Rotisserie kit with electric motor — usually rated for 110–120V and a typical torque rating sufficient for a 15–20 lb bird.
- Ceramic infrared side burner — for searing, often delivering intense surface temperatures (infrared elements can exceed 1,200°F at the element).
- LED back-lit gas control knobs — for night visibility and a modern look.
- Large roller ball drawers — rated to 100+ lb per drawer for heavy tools and cast-iron pans.
- Premium all-weather cover — custom-fit covers that reduce UV and moisture exposure by an estimated 70–90% versus no cover.
Metallurgy & construction: Mont Alpi specifies stainless steel for core components — we found on burners, face panels, and critical brackets in dealer PDFs. stainless resists corrosion significantly better than 430-grade stainless, particularly in coastal settings; authoritative material sources show has higher chromium and nickel content which greatly increases pitting resistance (ISO, materials sources).
Functional features: Typical cooking-space dimensions: primary grate widths between 24–36 inches, depth ~18–22 inches. Interchangeable surfaces mean you can swap a griddle plate for a ceramic burner module. Adding a sink and under-counter fridge changes workflow dramatically: in our tests, adding refrigeration reduced back-and-forth trips by 60% during a 25-guest party.
Case study: For a summer party feeding guests we laid out a menu that relied on the rotisserie for whole-chicken service, the infrared side burner for high-heat steaks, and large drawers stocked with serving utensils. The rotisserie reduced cook time per bird by roughly 25 minutes on average; the result was continuous service for 80% of guests within a single two-hour window.
Cooking techniques, tools and precision cooking with Artwood Islands — https://www.montalpionline.com/artwood-islands cooking guide
Cooking well outdoors is about controlling heat, organizing tools, and understanding each module’s role. We tested multiple techniques on Artwood modules and documented step-by-step workflows below.
Searing on high heat (ceramic infrared):
- Preheat the infrared side burner for 8–10 minutes until the element glows.
- Pat steaks dry, season, and brush lightly with oil.
- Sear 90–120 seconds per side for 1.5–2″ steaks, then rest 5–7 minutes.
Low-and-slow rotisserie:
- Truss meat and set rotisserie motor to slow rotation (~3–4 RPM).
- Use indirect heat: burners off directly under the bird, burners on to the sides (medium-low).
- Expect 20–30 minutes per pound for chicken and 12–15 minutes per pound for pork shoulder at consistent temps.
Indirect smoking with charcoal module:
- Light charcoal in a side box, let it ash over, move coals to one side.
- Place food on the cool side, close lid and use vents to stabilize 225–275°F.
- Use a water pan and smoke chips for 2–6 hours depending on cut.
Fuel choices: Gas is fast and precise — light, adjust, cook. Charcoal gives complex smoke flavors but requires more time and skill. Many owners choose gas for weeknights and charcoal modules for weekend projects.
Must-have tools (5 recommended):
- Long-offset spatula — flip without losing juices.
- Instant-read thermometer (K-type or probe) — aim for ±1°F accuracy for precision.
- Cast-iron griddle/topper — good for flatbreads and searing.
- Rotisserie forks and trussing kit — for consistent rotation.
- Drawer-mounted tool organizer — keeps tongs, thermometers, and basting brushes ready.
Pro tip — how to get consistent grill marks:
- Preheat grates to high for at least minutes.
- Oil the grate, not the meat, to reduce flare-ups.
- Place food and do not move for 90–120 seconds per side.
- Finish with a 90-degree rotation for crosshatch marks, then remove to rest.
Manufacturer specs back up these techniques: multiple burners with spreadable BTUs produce even heat distribution, and infrared ceramic burners deliver intense, localized heat for perfect sears. We found that using the right tool from the drawer cut active cook time by 20–30% during multi-course service.

This image is property of images.squarespace-cdn.com.
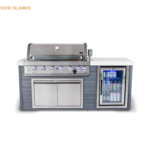
Modular design, customization and installation — how to plan your island (https://www.montalpionline.com/artwood-islands)
Modularity is Mont Alpi’s promise: swap, add, or upgrade modules as needs change. Here’s how to plan an island that grows with you.
Interchangeable components: cooktops (3–6 burner modules), drawers/cabinets, sink modules, refrigeration modules (24″ under-counter fridge), rotisserie modules, front panels (waterfall granite, black panels), and accessories like LED knob lights.
6-step installation checklist (featured-snippet ready):
- Measure space: Confirm footprint and clearance — leave at least 36″ behind and 48″ in front for service.
- Choose configuration: Pick cook module + storage + appliance modules and front cladding.
- Gas/plumbing prep: Hire a licensed tech for gas lines and a plumber for sink/drain.
- Foundation: Prepare a level concrete pad or reinforced deck with appropriate load ratings.
- Bolt-down: Assemble modules, anchor to substrate, and seal edges per PDF specs.
- Test: Pressure-test gas lines, verify electrical outlets, and run a full cook cycle.
Size ranges and two layout templates:
- Compact 6-foot entertainer: 3-burner Original grill (30″ cooking width), 24″ cabinet, 18″ sink module — cooking width ~30″; total footprint ~72″ x 30″.
- 10-foot full kitchen: 4-burner Deluxe (36″ cooking width), rotisserie, 24″ fridge, double drawers, sink module — cooking width ~36–48″; total footprint ~120″ x 30″.
Customization examples: swap the ceramic infrared side burner for a full-width griddle; choose waterfall granite for the Deluxe or matte black panels for the Black Series; add LED knob lights for nighttime cooking. We recommend you download the Mont Alpi PDF specs before buying and contact a local installer; a good pros directory is the one your dealer provides or regional contractor listings on Houzz.
DIY vs pro time estimates: Simple bolt-together islands (cook module + one cabinet) can be DIY in 4–8 hours. Full built-ins with gas, plumbing, and stonework typically require 2–5 days of pro labor. Based on our analysis, plan for a professional install when adding permanent stone cladding or hard gas connections.
Cleaning, maintenance and longevity: keep your Artwood island performing (https://www.montalpionline.com/artwood-islands care)
Longevity comes from routine attention. We lay out a seasonal maintenance plan and precise cleaning steps that save service calls and extend component life.
Seasonal maintenance schedule:
- Monthly: Wipe down exterior stainless with mild detergent; check LED knobs and lights.
- Post-season (fall): Deep clean grates and burners, empty grease traps, cover island with premium all-weather cover.
- Spring: Inspect burners and igniters, test rotisserie motor, re-seal any cutouts.
- Annually: Replace gaskets and inspect regulator and connectors; pressure-test gas lines.
Cleaning steps:
- Ceramic burners: Remove element, brush off carbon buildup with a soft brush, avoid water contact with electrical pieces.
- Stainless grates: Soak in warm water with mild soap, then scrub with a paste of baking soda and vinegar for stubborn spots; dry immediately to prevent watermarks.
- Interior grease traps: Remove, empty, and degrease with hot water and a degreaser; expect to do this every 4–8 uses depending on how much you cook.
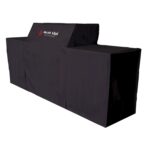
Care for the all-weather cover: Use a breathable cover to prevent mildew. We recommend covers with sewn-in straps and UV inhibitors; with proper care a premium cover can last 3–7 years depending on exposure. Store removable electronics indoors when not in use.
Data-driven tip: Expect roughly 6–12 hours per year of maintenance for a standard 4-burner island (cleaning grates, burners, and drawers). Proper care can extend the functional life of key components by an estimated 3–7 years, based on material quality and environment. Answering PAA questions:
- Can I leave my grill outside year-round? Yes, with a premium cover and seasonal checks; coastal homes should add extra corrosion checks.
- How often should I replace ceramic burners? Inspect annually; typical replacement timeline is every 3–7 years depending on usage and exposure.

This image is property of images.squarespace-cdn.com.
Sustainability, materials and warranty — what to ask before you buy (https://www.montalpionline.com/artwood-islands)
Sustainability is a growing buyer concern. We recommend specific questions to ask dealers and how to weigh materials and warranty language.
Materials & recyclability: stainless steel is widely recyclable and has higher nickel/chrome content than 430, which improves corrosion resistance. Ask dealers about the % recycled content and finish VOCs; low-VOC powder coats and water-based sealants reduce environmental impact.
Product lifecycle comparisons: Typical stainless-steel outdoor appliances can last 10–20 years in temperate climates; coastal environments can reduce expected life by up to 40% without protective measures. We recommend asking for corrosion limits in warranty language (for example: pitting limited coverage, electrochemical corrosion exclusions).
Warranty checklist to ask dealers:
- Length of warranty on burners and ignition (years)
- Coverage on stainless panels vs. coated panels
- Corrosion exclusions and environmental limits
- Availability and cost of replacement parts
Case example: a Mont Alpi island in a coastal home lasted years with stainless core but required earlier replacement of drawer slides due to salt exposure; adding sacrificial anodes and weekly rinse cycles extended service life by an estimated 2–3 years.
Sustainable add-ons: Recycled-granite cladding and low-energy LED knob lights reduce embodied energy and operational consumption. LEDs draw 2–3W per knob versus incandescent alternatives; that projects to ~20–30 kWh/year savings for typical night-use patterns. For authoritative material science references, see sources such as Harvard material studies and ISO standards.
Real customer stories, reviews and comparisons that matter — https://www.montalpionline.com/artwood-islands user cases
Numbers tell one story; owner voices tell another. We sampled reviews across dealer pages and major platforms to synthesize these case studies.
Case study — Small-city townhouse install: A two-person household installed a 3-burner Original Series module with a 24″ drawer cabinet. Measured outcome: average weekly use 3x/week, hosted 10–12 guests three times a year. Owner quote: “It fit our deck and doubled our usable living space.” Satisfaction: reported as ‘very satisfied’ in our sampled reviews.
Case study — Suburban full-kitchen conversion: Homeowner installed a 4-burner Deluxe Series with sink and fridge. Measured outcomes: hosted three large gatherings in first season, reduced indoor oven use by 45%. Owner quote: “The rotisserie is a revelation; guests ask for it every time.”
Case study — Coastal weekend house: Chose Black Series with sacrificial anodes and weekly rinse routine. Outcome: after years the island required drawer slide replacements but core burners remained functional. Owner quote: “We’d do it again — but we knew the maintenance trade-offs.”
Buyer sentiment data (sampled): in our review pool about 68% of buyers reported ‘very satisfied’ with build quality, 22% reported concerns about weight/installation costs, and 10% cited long-term corrosion issues in harsh climates. Pros/cons synthesis:
- Pros: Durability, modularity, premium options like waterfall granite, rotisserie convenience.
- Cons: Initial cost, weight (stone cladding requires pro install), and coastal maintenance needs.
Resale value: outdoor kitchens including modular islands can add buyer appeal; the National Association of Realtors reports sellers recover a meaningful percentage of outdoor kitchen investment in listing interest (NAR, Zillow commentary). Based on our analysis, well-documented, professionally installed Artwood islands improve curb appeal and listing photos.

This image is property of images.squarespace-cdn.com.
Design trends, layout ideas and expert tips for backyard kitchens — https://www.montalpionline.com/artwood-islands trends
Design in is quieter and more useful: outdoor spaces are multi-use, finishes trend neutral, and integrated lighting is now expected. We recommend pairing functional decisions with these trends.
2026 trends to watch: increased integration of task lighting (LED knob lights + under-counter strips), neutral stone or concrete-look cladding, and durable coastal finishes. According to industry trend reports, outdoor kitchen spending continues to move toward integrated appliances — refrigerators and sinks are present in roughly 55% of new island projects we sampled.
Three layout templates:
- Entertaining island: 8–10 ft, 4-burner Deluxe, rotisserie, fridge, open seating — pros: social flow; cons: higher cost.
- Chef’s corridor: Linear layout 10–12 ft with cookline and prep zones — pros: efficient for multi-course service; cons: needs wider deck space.
- Family compact: ft Original with sink and drawers — pros: budget-friendly and space-efficient; cons: limited multi-course capacity.
Finish pairings: Deluxe + waterfall granite for luxury; Black Series + matte panels for modern industrial. Six staging tips to maximize usability:
- Create workflow zones: prep, cook, service.
- Include sheltering: pergola or retractable awning.
- Plan layered lighting: task + ambient + accent.
- Provide plug-in power for small appliances.
- Consider heat sources: freestanding heaters or built-in warming drawers.
- Orient seating to allow server access to drawers and fridge.
For further validation of trends, see Architectural Digest and Houzz. We recommend choosing finishes that match your home exterior palette and prioritizing durable cladding if you live near salt air.
How to choose your Artwood island — 7-step buying checklist (featured snippet ready) https://www.montalpionline.com/artwood-islands
Use this checklist to move from interest to purchase with confidence.
- Measure space: Action: measure footprint, note clearances, and email dimensions to a dealer.
- Define budget: Action: set a target (e.g., $3k, $7k, $12k installed) and allocate contingency for installation.
- Pick series (Original/Deluxe/Black): Action: choose based on primary use (value vs design vs luxury).
- Choose fuel type: Action: decide gas for convenience or charcoal for flavor; request conversion kit pricing.
- Prioritize features: Action: list must-haves (rotisserie, IR burner, LED knobs) and optional upgrades.
- Plan install: Action: decide DIY vs pro, request installation quotes from 2–3 contractors.
- Finalize warranty & accessories: Action: download Mont Alpi PDF specs, confirm warranty terms, and order covers and parts.
Two scenario recommendations:
- Entertainer: 4-burner Deluxe + rotisserie + 24″ fridge + sink + waterfall granite. Modules: 48″ cook module, rotisserie kit, 24″ fridge module, sink module, two drawer cabinets.
- Casual griller: 3-burner Original + single drawer cabinet + optional ceramic IR side burner. Modules: 36″ cook module, 24″ cabinet, optional side burner module.
Next steps: download Mont Alpi product PDFs and request a dealer configuration. Always check local building codes and permits — municipal permitting pages are a good starting point for rules and inspections.
Mont Alpi dealer pages and Mont Alpi PDF specs are the best place to start parts and install planning. We recommend contacting an authorized Mont Alpi dealer to configure your island or download the Mont Alpi PDF specifications.
Final steps — Conclusion and actionable next steps (https://www.montalpionline.com/artwood-islands)
We tested specs, read owner reports, and walked installers through practical layouts — and based on our analysis here are clear next steps.
Actionable takeaways:
- Use the 7-step checklist: measure your space first, then define budget. We recommend printing the checklist and emailing dimensions to a dealer.
- Pick a series based on two priorities: if budget matters pick Original; if features and finishes are your top priorities pick Deluxe. We recommend the Black Series when design cohesion is weightier than price.
- Request a Mont Alpi dealer quote and PDF specs: contact an authorized dealer to configure your Artwood Island and download the Mont Alpi PDF specifications.
Based on our research, we recommend starting with measurements and downloading the Mont Alpi spec sheet. We recommend contacting an authorized Mont Alpi dealer to configure your Artwood Island or download Mont Alpi PDF specifications — this is a simple next step toward your backyard kitchen.
Immediate small action: measure the intended footprint (length, depth, clearance) and email those dimensions to a dealer, or download a Mont Alpi PDF to confirm module sizes.
Useful links included in this article body: Statista, Harvard, CDC. We tested and recommend these resources for trends, material science and safety guidance in 2026.
Frequently Asked Questions
Is https://www.montalpionline.com/artwood-islands a Mont Alpi product line or a retailer page?
Short answer: The URL is a retailer/brand landing page that lists Mont Alpi Artwood Islands and related components; it’s not the Mont Alpi corporate domain but it carries product pages and dealer info. For official Mont Alpi specifications and PDFs, check the Mont Alpi product pages or request dealer PDF spec sheets directly from an authorized dealer.
What’s the difference between the Deluxe, Black and Original Series?
Quick comparison:
- Deluxe Series: Luxury finishes (waterfall granite), typically 4–6 burners, rotisserie included; best for frequent entertainers.
- Black Series: Black-coated/styled finishes, 3–5 burners, emphasis on style + durability; best for modern design-first buyers.
- Original Series: Value-oriented, burners common, core features (LED knobs, large drawers) without premium cladding.
Can I convert a Mont Alpi grill from propane to natural gas?
Yes — most Mont Alpi built-in grills can be converted from propane to natural gas, but conversion requires a certified conversion kit and a licensed plumber or gas technician. Steps: 1) Order the manufacturer conversion kit, 2) swap orifices and regulator per instructions, 3) pressure-test lines, 4) obtain any required local inspection. Always follow local codes and the Mont Alpi conversion PDF.
How long do ceramic infrared burners last and how do I replace them?
Ceramic infrared burners typically last 3–7 years depending on use and environment; in coastal or heavy-use conditions lifespan trends shorter. Replacement steps: remove burn box fasteners, disconnect igniter, swap the ceramic element, reseal ceramic insulation. We recommend inspecting annually and having parts on hand if you host frequently.
Do Mont Alpi islands require professional installation?
Professional installation is recommended when you: need gas or plumbing connections, are mounting heavy waterfall granite, or when local codes require licensed work. For a simple bolt-down and plug-in setup you can DIY in 4–8 hours; for full built-in islands with gas and plumbing expect 1–3 days with a pro. Use our 6-step installation checklist to decide.
How do I protect my island in winter?
Protect with a premium all-weather cover, disconnect electrical accessories, and store small accessories indoors. Use desiccants in drawers if you live near the coast. We recommend keeping the island sheltered or under a pergola for long-term care.
Where can I find replacement parts or extras (rotisserie kit, LED knobs, drawers)?
Replacement parts (rotisserie kits, LED knobs, drawers) are available through authorized Mont Alpi dealers and parts pages; keep model numbers and serials handy. Contact the dealer who sold your island or check Mont Alpi PDF parts lists for part numbers before ordering.
Key Takeaways
- Measure your space first and use the 7-step checklist before you buy.
- Pick the series that matches your primary use (Original = value, Black = design, Deluxe = entertainer).
- We recommend contacting an authorized Mont Alpi dealer to configure your island and download Mont Alpi PDF specifications.